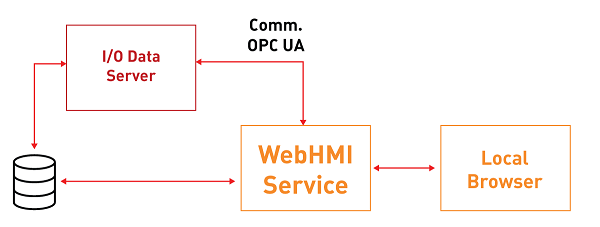
WebHMI Runtime Linux (ARM)
WebHMI is the ideal solution
for creating stand-alone applications in HMI with Windows or Linux operating
systems.
The HMI can be managed by remote
by predisposing the Deploy Server on the device and using the Deploy Project
window and HMI Control directly from the Movicon.NExT development environment.
Preparing
HMI with the Linux operating system (ARM)
WebHMI allows you to create stand-alone
applications in HMI with the Linux operating system (ARM) that is compatible
with .NET Core, such as for example Raspberry devices with Raspbian distribution.

|
The compatibility with
.NET Core by the used Linux distribution is necessary for WebHMI
to function.
|
Some components have been in
the Linux environment allow I/O Data Server and WebHMI execution by installing
them manually as indicated below.
.NET Core
installation
Download and install the .NET
Core SDK 2.1 on the HMI
To download
the Binaries for ARM, go to this page: https://dotnet.microsoft.com/download/dotnet-core/2.1
For Raspbian,
download: https://download.visualstudio.microsoft.com/download/pr/47cf1500-e5de-4fb6-8506-2818beda75bc/288834aa886d9374acca223591413435/dotnet-sdk-2.1.806-linux-arm.tar.gz
Download and install the .NET
Core SDK 6.0 on the HMI.
To download
the Binaries for ARM, go to this page: https://dotnet.microsoft.com/download/dotnet-core/6.0
Download the "InstallDotNet.sh"
script and copy it in the same folder where the two previously downloaded
tar.gz archives have been saved.
Check that the pi user is present
on the device, otherwise change the paths present in the "InstallDotNet.sh"
file.
Copy the downloaded files (tar.gz)
and the script (InstallDotNet.sh) in a local device folder as it will
not be possible to run them from an external device (e.g. USB dongle).
Open the terminal on the device
and go to the folder in which the "InstallDotNet.sh" file
resides.
Use the "chmod +x InstallDotNet.sh"
command.
Use the "./InstallDotNet.sh"
command.
Check that both versions are installed
and acknowledged correctly with the "dotnet --info" command.
Database
Management System Installation
It is up to the developer to choose
which Database Management System (DBMS) to install. However,
a dedicated MySQL called MariaDB is available for Raspbian/ARM for
which the installation commands are.
sudo
apt-get update
sudo
apt-get upgrade
sudo
apt-get install mariadb-server
sudo
mysql_secure_installation
For further information please
go to: https://pimylifeup.com/raspberry-pi-mysql/
Deploy
Server Installation
Copy
the contents from the "DeployServer-Files" folder, present
in the Movion.NExT installation folder (e.g. at path: "C:\Program
Files\Progea\Movicon.NExT 4.0\DeployServer-Files") to the HMI.
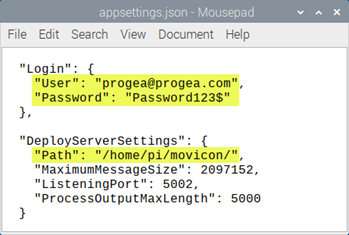
Modify
the "DeployServer-Files" folder's "appsettings.json"
file specifying:
|
The username
should be an existing or non existing email address, such as progea@progea.com |
|
The
password must be the minimum of 7 characters in length and must
include a special character, an uppercase character and a number.
|
path:
the path in which the Deploy Server will save the transferred
components (I/O Data Server, WebServer and Project)
Change
the rights to the copied folder by giving full rights to the user
who is using it (this step is optional, it may be omitted by using
the sudo command before all the following terminal commands).
Open
the terminal window folder you have just copied and run the "sudo
dotnet dev-certs https" command to generate the certificate from
the Deploy Server.
To
startup the Deploy Server, you can use the "sudo dotnet DeployServer.dll"
command to start it up manually, or configure it in a way that it
is launched at the HMI startup as service.
When
using the “sudo nano /etc/systemd/system/DeployServer.service”
command it will create a .service file in the “/etc/systemd/system/”
folder and it will open it directly with the text editor from
the nano terminal.
Insert the following
contents in the file by paying attention to the WorkingDirectory
and ExecStart fields concerning the path where the Deploy Server
was copied:
[Unit]
Description=Movicon
NExT DeployServer
[Service]
WorkingDirectory=/home/pi/Documents/DeployServer-Files
ExecStart=dotnet
/home/pi/Documents/DeployServer-Files/DeployServer.dll
Restart=always
RestartSec=2
SyslogIdentifier=DeployServer
User=root
Environment=ASPNETCORE_ENVIRONMENT=Production
[Install]
WantedBy=multi-user.target
Use
the “sudo systemctl daemon-reload” command (loads any service
modifications)
Use
the “sudo systemctl enable DeployServer.service” command (enables
the service just created)
Use
the “sudo systemctl start DeployServer.service” command (starts
up service)
Now
if you use the “sudo systemctl status DeployServer.service” command,
it will be active and running (checks the service status)
|
In
order to install the license correctly, the Deploy Server must
be started up with administration rights. |
|
The
Deploy Server listens on the 5002 (TCP) port. Therefore,
you will need to check that the firewall permits communications
on this port.
|
Deploying
Projects in HMI
For further information on transferring projects
to remote devices, please refer to "Deploying
Projects in HMI"