During
the Project Runtime phase the active alarms can be viewed through the
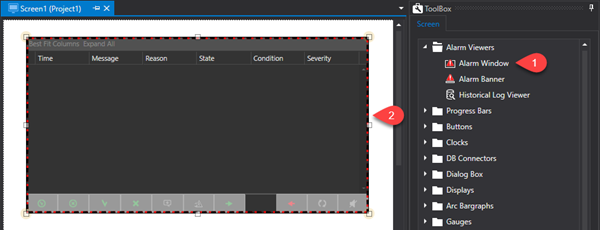
"Alarm Window" object or the "Alarm Banner" object
on screen.
The Alarm
Window object, available from the Toolbox, is used for listing active
project alarms. In addition to viewing alarms the Alarm Window can be
used for performing other operations by using the buttons described below:
ACK: acknowledges alarm. This event
is recorded in the Historical Log table's "Details" column
with the "The alarm was acknowledged" message
Reset: resets alarm. This event
is recorded in the Historical Log table's "Details" column
with the “The alarm was confirmed” message
Shelve: delays alarm activation.
The delay time is inserted in the entry field at the side of the button
in the "D.hh:mm:ss" format. This event is inserted in the
historical log table "Details" column with the "The
alarm was shelved” message
Unshelve: the alarm activation delay
is suspended. This event is inserted in the historical log table "Details"
column as "The alarm was unshelved”
Shelve Time: the shelve time is
specified in this field. The time entered in the field will
be taken into consideration when an alarm is shelved. Once this
time has expired the alarm will be reactivated. Time must be
entered in Days, hours, minutes and seconds.
Ack All: acknowledges all the active
alarms in the window
Reset All: resets all the active
alarms in the window
Refresh: refreshes the window's
alarm list
Add Comment: this command opens
a dialog window in which it is possible to insert a comment to associate
to the selected alarm. This comment will be saved in the alarm's persistence
file and then displayed in the Alarm Windows "Comment" column
each time the alarm is activated. In addition, this comment
will also be recorded in the Historical Log table in the relevant
"Comment" column and then displayed in the Historical Log
window's "Comment" column. In this case the comment will
be shown for all the alarm's different recorded states (active, inactive,
acknowledge, confirmed, etc.)
Disable Sound: when managed as a
toggle, this button is used for enabling or disabling the alarm sound.
This command is linked to the "AlarmSoundState" Server's
system variable. Therefore the alarm sound can be toggled directly
in this variable ("AlarmSoundState" = True: enables sound,
"AlarmSoundState" = False: disables sound). The AlarmSoundState
tag's persistence information is recorded in the IsolatedStorage and
therefore is UserBased information. If the Windows user is changed,
it will also be possible to save the sound state in a different mode.
Time On: indicates the alarm's activation
time.
Message: shows the alarm text.
Condition: shows the name of the
alarm's activation variable.
State: shows the alarm's state.
This information is divided into two sections, the first one
defines whether the alarm cause is active or not, "Active"
or "Inactive", while the second one shows the action type
that still has to be executed: "Unacknowledge", "Unconfirmed".
For example, an active alarm that has not yet been acknowledged will
the "Active | Unacknowledge" state. Conversley, an alarm
which is not active and has already been acknlowledged and reset will
have the "Inactive" state and its message will disappear
from the window by simply executing the Refresh command.
Details: shows
alarm details relating to the alarm.
Severity: shows
the alarm's severity.
Icon: This
replaces the names of columns with a graphic icon.
Change State Time:
indicates the instance in which the alarm changed state (e.g. from
a High threshold to a High-High threshold, or alarm cause switches
from ON to OFF).
Branch:
indicates which branch the alarm belongs to.
Quality: indicates
the alarm's quality.
Comment: shows
any comments associated to the alarm.
Area/Source: indicates
the alarm's Area or Source.
Active Time: see
Time ON column.
Acknowledgement Time: indicates
when the alarm was acknowledged.
Confirmation Time: indicates
when the alarm was confirmed.
Shelving Time: indicates
when the alarm was shelved.
Child Project Name: indicates
any child project which the alarm belongs to.