Movicon.NExT Help on Line - Tutorial
In this section we will create a simple project to represent an alarm simulation of an example project.
In this example we will use 3 tags and 3 alarms assigned to the tags.
To simulate activation in runtime, we will use three "selector" command objects associated to the tags.
Proceed as follows:
Open the Platform.NExT workspace
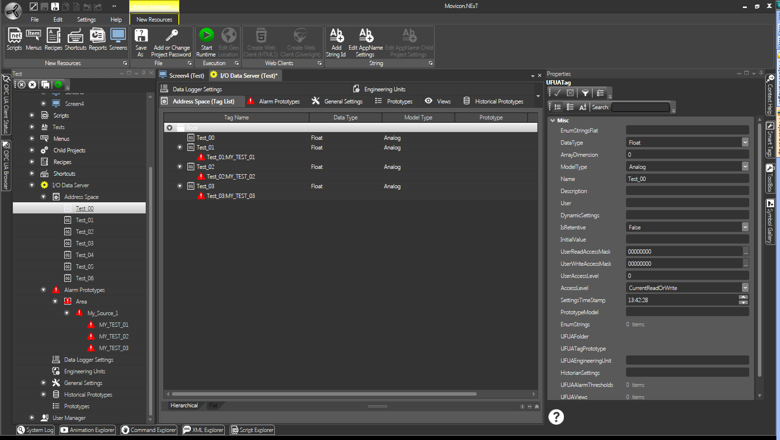
Access the 'I/O Data Server and create three new tags in the Address Space with the names of Test_01, Test_02 and Test_03, leaving their properties set for default.
Remain in the 'I/O Data Server and access the Alarm Prototypes resource and crate a new Alarm prototype by creating the Area, Source and three Alarm Definitions called MY_TEST_01, MY_TEST_02 e MY_TEST_03. Leave properties set for default.
Return to the Address Space resource to assign the tags to the alarms you have just created. Select the Test_01 tag and activate the "Assign Alarm Definition" command by selecting the MY_TEST_01 alarm. Repeat for the other tags.
We will not assign text strings for the time being but leave the alarm text currently displayed as the alarm's name.
The workspace will look like this after tags and alarms have been created and assigned.
After having configured the alarms and Tags, we will continue with the graphical interface: we will create a new screen and insert alarm viewers from the Toolbox then size them as pleased.
Drag three graphical Switch button objects in the form of selectors form the Toolbox and drop them onto the screen underneath the Alarm Viewers.
Assign the tags to the selector switches simply using the Drag&Drop techniques (or using the object configuration window). For example, Select the "Test_01" tag from the project's tree structure's Tag, and drag it to the first of the three selectors. Repeat this operation for the other two Tags.

After having created the screen with the Alarm Viewers and tag command controls, the workspace will look like this.
At this point we only need to start the project up in Runtime and test run the simulation:
Activate the "Start Runtime" command available from the "Project Manager - New Resources" ribbon. The project will startup in Runtime.
Open the alarm simulation screen we have just edited from the main window.
The screen will show with the Alarm Viewers and Tree Seletors. By manipulating the three selectors the tag should change status when passing to value "1" to activate the alarm. A message will appear in the Alarm Viewer reporting the alarm activation.
You can then use the Acknowledge and Reset button provided in the Alarm Viewer.
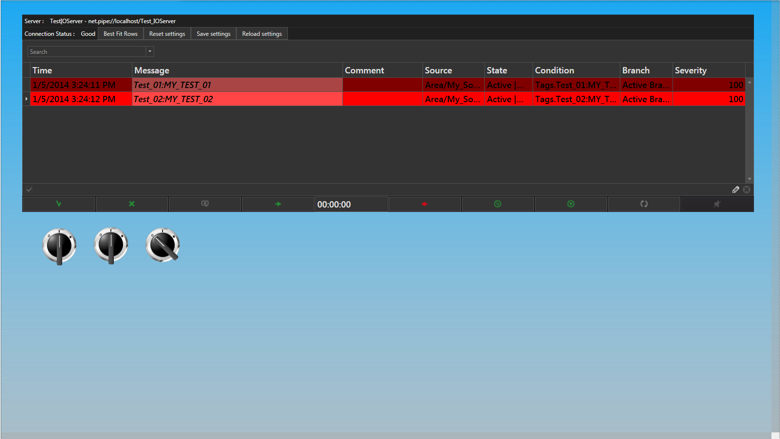
Alarm simulation screen during runtime.
![]()