Movicon.NExT Help on Line - Tutorial
Different object types dedicated to executing commands can be inserted on the screen user interface with the possibility to modify Tag values. The Toolbox provides a vast range of different objects to choose from and which are dedicated to executing command or determining Tag values.
All these objects are pre-configured with styles that can be modified as pleased to represent values.
The different command objects:
Objects dedicated to executing Commands can be inserted on the screen user interface to use for changing page, setting values in tags, executing scripts or changing project language along with many other possibilities. You will also find objects dedicated to act on tag values, such as the ON-OFF button (checkbox), or meters.
Objects that operate on Tags
This objects are mainly those belonging to the "Analog Controls" or "Button - Digital Checkbox" Toolbox categories.
These types of objects have been purposely designed to act on tags, therefore after having inserted and customized the object's styles a reference tag must be assigned so that it can act on the tag's value according to user operations performed in runtime.
Command execution objects
These objects are mainly those belonging to the "Button - Commands" Toolbox category.
Specific commands or lists containing various commands can be associated to these objects using a predisposed configuration window designed for this purpose.
|
|
It is important to note that even though each object can be completely configured in style, its mechanics will remain those for the purpose it was designed for. In other words, it is possible to insert a "checkbox", in the form of a button, and then change its style as pleased by associating it with any graphical symbol from the symbol libraries. However, the object strictly functions as a "checkbox" and cannot function as a command object. |
Assigning commands
To configure the assignment of one or more commands to an object you will initially need to select and insert a command object from the Toolbox. Please note that project commands can only be assigned to the category of objects whose mechanics have been purposely designed for command settings. Therefore, select the objects belonging to the Toolbox "Buttons - Commands" group.
After having inserted one of these command objects, you will be able to activate the "Common Property Editr" settings window which you have already seen for configuring dynamic animations.
Among the tabs shown in the window you will find the Commands tab, as shown below, containing the Commands available for inserting in the object's command list.
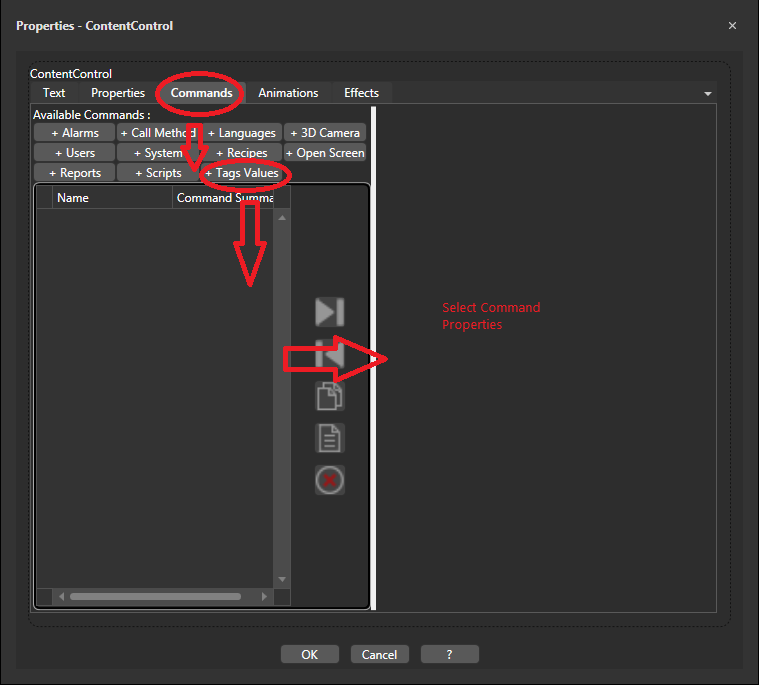
After having added the desired command using the buttons at the top of the window, you can now proceed with setting the relative parameters by double clicking on a row in the list to update the window with the selected command's parameters.
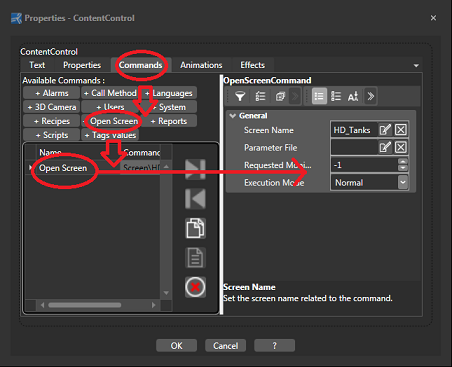
For example, if you wish to create a change page command, you will need to select the "Open Screen" command from the list of commands as indicated in the figure below. Please note that the same command can be inserted numerous times whereby a list can be created to execute the commands in sequence.
Example:
The procedure below explains how to associate two different command to two Buttons. The first command is a "Set" tag command and the second is a "Change Page" command.
To insert the "Set" command of a tag proceed as follows:
Open a project screen.
Open the Toolbox and click to select an object from the "Buttons - Commands" group.
Position the mouser pointer where desired on the screen and click to release the object in that position.
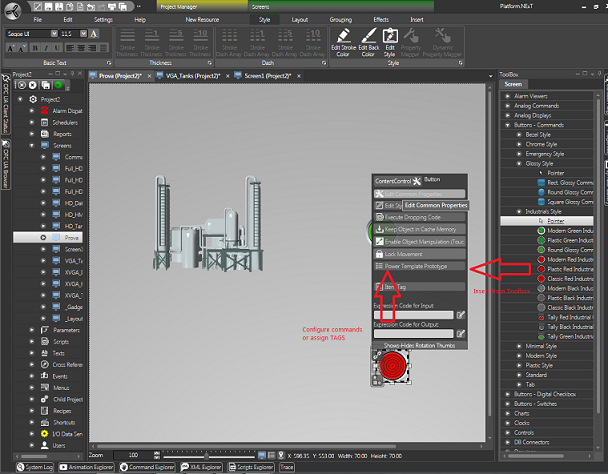
Select the object and open the command Tooltip then click on the "Common Property Editor" button.
In the dialog window that shows you will see some tabs where different types of settings can be defined. Select the "Commands" tab which is the one we need to use.
Click on the "Value" item in the "Commands" window to add the command we need to work with. The command will then be added to the list ready for configuring.
By selecting the added "Value" command from the list, the window will update with the "Value" command's parameters enabling you to define them as desired. For example, if you set the "Value" field with the "1" value and the "Type" field with the "Toggle" action, every time the Button is pressed the tag associated to the command will change from the "0" to the "1" value and viceversa.
Go to the Tag item and select the variable with which the button will act on.
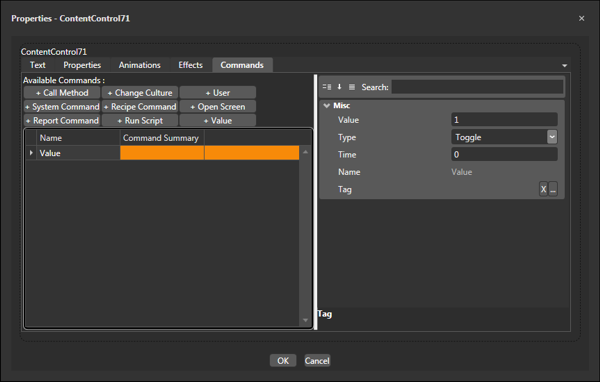
Window containing the Value command's parameters ready for configuring.
If no variable is specified in the Command's "Tag" field, Movicon will use the one associated to the object for managing the Command (see paragraph on Assigning Tags to Objects). If no variable has been associated to the object and no variable has been inserted in the "Tag" property, the Command will have no effect in Runtime.
Now check whether the Command works by launching the project into runtime Starting UP Project in Runtime and clicking on the button. The "Variable1" value should set to "1". This action can be viewed better if you insert an "EditDisplay" object to show the "Variable1" when set by the Button.
To insert the "Change Page" command proceed as follows:
Open a project screen or use the one you already opened beforehand.
Open the Toolbox and select by clicking an object from the "Buttons - Commands" group.
Position the mouser pointer where desired on the screen and click to release the object in that position.
Select the object and open the command Tooltip then click on the "Common Property Editor" button.
In the dialog window that shows you will see some tabs where different types of settings can be defined. Select the "Commands" tab which is the one we need to use.
Click on the "Open Screen" item in the "Commands" window to add the command we need to work with. The command will then be added to the list ready for configuring.
By selecting on the command added to the list the window will update with the "Open Screen" command's parameters.
You can now go ahead and define the settings desired using this window. For example, set the "ScreenName" field by selecting the screen name you wish to open, "Screen1", and select the "Normal" action in the "ExecutionMode" field. This will determine the opening of "Screen1" in "Normal" mode when pressing the Button.
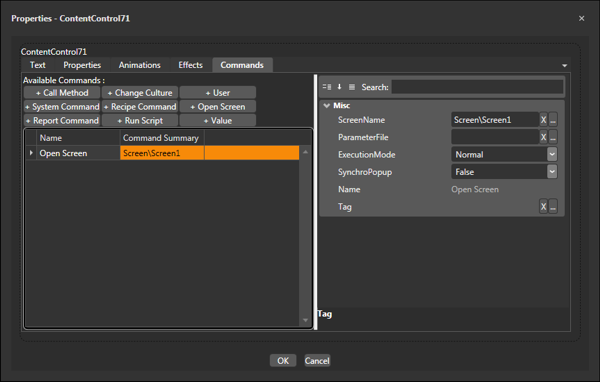
Command Settings Window with the Open Screen command added to the list.
Now check whether the Command works by launching the project into runtime Starting UP Project in Runtime and clicking on the button. The "Screen1" screen should load.
![]()
